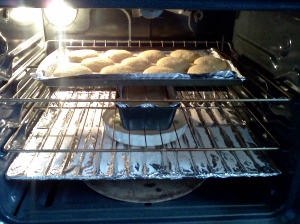
Check out how we roll..ha, ha, hum. (cough). Sourdough bread rolls and loaf are rising nicely in our clean oven, “dissected ” for you in this post!
Today’s Mama Mondays post is a series of quick tips to help keep your oven clean, avoid smoke-generating spills, and maintain an even temperature for baking at low-temperatures or for long periods. This is especially useful if you are baking sourdough bread, drying chives, or roasting tomatoes.
TIP ONE: Clean your oven using all-natural cleaners so you don’t have to worry about toxic fumes getting into your food (or lungs/skin as you clean). I use baking soda and vinegar. First, I spray neat white vinegar all over the interior of the COLD oven, then using a spoon I “splash” baking soda over the vinegar droplets to make them fizz. I allow baked-on residue to soak in vinegar for a while before applying any baking soda. Excess baking soda makes a mild abrasive that is great at picking up grease and “splatter”. I use a damp washcloth to help rub the baking soda across the oven’s interior surface. I wet the washcloth to remove excess baking soda once the oven is clean. For more tips on cleaning your oven, try Open Eye Health’s natural home cleaning eBook.
TIP TWO: Place a clean Pizza Stone or Baking Tile on the bottom of your oven (or on a rack closest to the heat source). A Pizza Stone or Baking Tile provides “thermal mass”: it absorbs thermal energy and releases it at a steady rate, reducing oven temperature fluctuations and the negative impact of doing things like opening the oven door to check on your food (although try not to leave the door open any longer than you have to even with a stone/tile). It also helps to normalize the temperature of the oven so there are fewer hot/cold spots: this promotes even baking especially in older or irregular ovens.
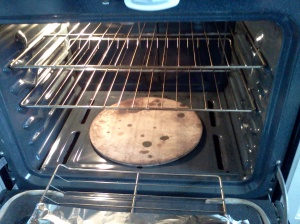
My oven is sparkling thanks to the vinegar and baking soda. The pizza stone, as you will notice, is not so clean-looking. I did clean it, but the oil wouldn’t come off. I have noticed that since putting it in the oven (damp) and using it as a thermal mass, all the oil stains have disappeared. My pizza stone looks brand-new now. Interesting!
TIP THREE: Create a catching tray. The easiest way is to place aluminum foil on a rack at the lowest setting. It is important to create “grooves” so that any liquid spilling over a dish is caught and doesn’t run off the plane of the aluminum foil to the oven’s floor. Filling the grooves with cheap table salt is the best way to absorb liquid and prevent food from smoking (a great tip I learned from Open Eye Health’s eBook is to sprinkle salt on anything that spills in your oven: this allows you to continue baking without setting off smoke alarms!). If you are concerned about your aluminum load and avoid using/buying aluminum foil, you can use a stainless steel baking tray with a lip instead. Make sure the foil/tray doesn’t cover the entire rack (leave a gap around the sides) so that the heat can circulate in the oven properly (keep in mind that adding this catching tray may add to your baking time slightly by reducing the impact of the heat radiating from your oven’s element and therefore increasing your baked good’s reliance on convection-based heat). A catching tray makes future oven cleaning a snap: just throw out the old salt and replace!
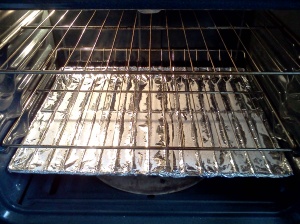
Get in the Groove! A salted catching tray made of aluminum foil.
TIP FOUR: Hydrate! Gas ovens can be drier than electric; using a catching tray with slightly longer cooking times/more reliance on convection can also make cooking a little drier. The solution is easy: place a ceramic or glass pan filled with filtered water either directly on the catching tray or on a rack in the setting above the catching tray (depending on how many racks and height settings you have). If you are baking bread and don’t want it to get soggy from the steam, put a small amount of filtered water in the pan so only as much steam as needed is released; after the water has evaporated, you can remove the pan (when it is empty, using oven gloves) to speed up the cooking time. Why use filtered water? When the water has evaporated, the mineral deposits will be left on your dish. Most of the time this is easy to remove with plain tap water. However, depending on what minerals are in your water, you may not want to bake them along with your souffles, etc. 🙂 Don’t use a hydrating pan if you are trying to dry or roast something. To keep roast meat or vegetables moist, use oil or fat and consider using a cover to keep the steam in.
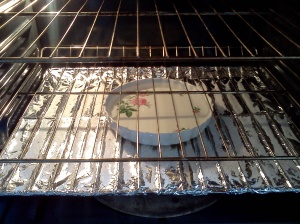
Baking can be a bed of roses…when you use a hydrating pan to combat dryness 🙂
Helping of Hope: Right choice. Cleaning your oven with all natural ingredients and catching spills in advance with a salted catching tray; using thermal mass and a hydration pan to control your baking environment. Bright future: easy and guilt-free oven cleanup; better results in baking!
If you enjoyed this week’s Mama Mondays post, please share using one of the many options below. Thanks!


